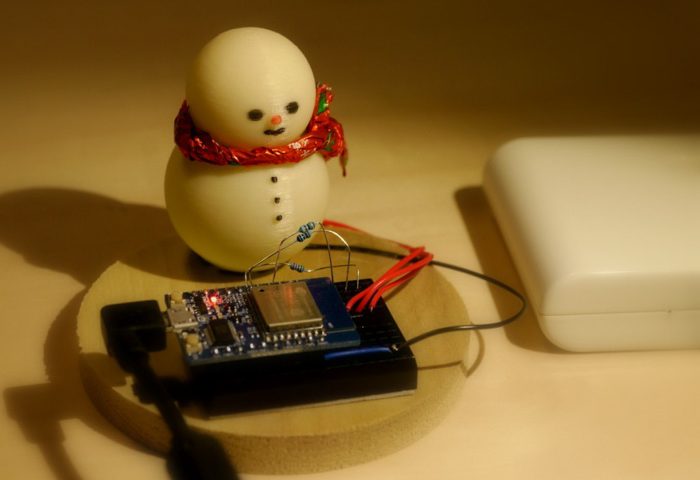
利用ESP-WROOM-02和天氣API製作會發光的耶誕雪人

許多應用都用過ESP-WROOM-02,並且通過Arduino程式利用了該擴展板的wifi通信功能。今天,我們要實現一個更具創意性的專案,根據天氣API的天氣資訊製作另一款炫麗的聖誕裝飾品。
今天的電子設計技巧
估計完成時間:90分鐘
所需零件:
- ESP-WROOM-02 擴展板
- 麵包板
- LED – 綠色
- 電阻 220Ω / 180Ω / 91Ω
- 高功率 RGB LED
為了啟用ESP-WROOM-02擴展板的Arduino程式無線通訊功能,我想首先嘗試一個範例程式。選擇File → Sketch Example → ESP 8266 WiFi → WiFi Web Server。該範例程式負責處理與Arduino的Wifi通信。

圖1 載入程式範例
這個範例程式能讓ESP-WROOM-02成為伺服器。程式啟動後,它會一直等待來自其他端子的請求,當收到帶有參數的請求後,程式就會處理該參數。在我們的例子中,我們將使用這個程式來點亮LED。
我想使用上次的電路進行測試。將範例程式中的引腳 “2” 更改為引腳 “13” 。
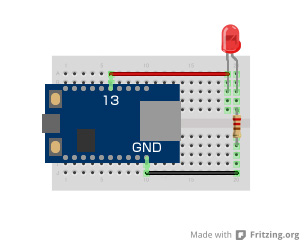
圖2 LED控制電路
|
1 2 3 4 5 6 7 8 9 10 11 12 13 14 15 16 17 18 19 20 21 22 23 24 25 26 27 28 29 30 31 32 33 34 35 36 37 38 39 40 41 42 43 44 45 46 47 48 49 50 51 52 53 54 55 56 57 58 59 60 61 62 63 64 65 66 67 68 69 70 71 72 73 74 75 76 77 78 79 80 81 82 83 84 85 86 87 88 89 90 91 92 93 94 95 96 97 98 99 |
/* * This sketch demonstrates how to set up a simple HTTP-like server. * The server will set a GPIO pin depending on the request * http://server_ip/gpio/0 will set the GPIO2 low, * http://server_ip/gpio/1 will set the GPIO2 high * server_ip is the IP address of the ESP8266 module, will be * printed to Serial when the module is connected. */ #include <ESP8266WiFi.h> #include <Servo.h> const char *ssid = "Provide SSID of wireless router here"; const char *password = "Provide the wireless router password here"; // Create an instance of the server // specify the port to listen on as an argument WiFiServer server(80); void setup() { Serial.begin(115200); delay(10); // prepare GPIO2 pinMode(2, OUTPUT); digitalWrite(2, 0); // Connect to WiFi network Serial.println(); Serial.println(); Serial.print("Connecting to "); Serial.println(ssid); WiFi.begin(ssid, password); while (WiFi.status() != WL_CONNECTED) { delay(500); Serial.print("."); } Serial.println(""); Serial.println("WiFi connected"); // Start the server server.begin(); Serial.println("Server started"); // Print the IP address Serial.println(WiFi.localIP()); } void loop() { // Check if a client has connected WiFiClient client = server.available(); if (!client) { return; } // Wait until the client sends some data Serial.println("new client"); while(!client.available()){ delay(1); } // Read the first line of the request String req = client.readStringUntil('\r'); Serial.println(req); client.flush(); // Match the request int val; if (req.indexOf("/gpio/0") != -1) val = 0; else if (req.indexOf("/gpio/1") != -1) val = 1; else { Serial.println("invalid request"); client.stop(); return; } // Set GPIO2 according to the request digitalWrite(2, val); client.flush(); // Prepare the response String s = "HTTP/1.1 200 OK\r\nContent-Type: text/html\r\n\r\n<!DOCTYPE HTML>\r\n<html>\r\nGPIO is now "; s += (val)?"high":"low"; s += "</html>\n"; // Send the response to the client client.print(s); delay(1); Serial.println("Client disonnected"); // The client will actually be disconnected // when the function returns and 'client' object is detroyed } |
啟動程式後,請嘗試連至路由器。如果已經連接,那麼系統會在序列監視器上顯示IP位址等。所以,請嘗試從瀏覽器訪問該IP位址。連至/gpio/1時,LED亮起;連至/gpio/0時,LED熄滅。

圖3 Wifi訪問成功

圖4 智慧型行動電話連接
通過程式控制伺服馬達
接下來我們通過一個實際例子試著用Wifi控制伺服馬達。伺服馬達的控制基本上應與LED控制相同。我將在LED程式中添加一些修改,並通過從瀏覽器訪問時添加一些HTML。
|
1 2 3 4 5 6 7 8 9 10 11 12 13 14 15 16 17 18 19 20 21 22 23 24 25 26 27 28 29 30 31 32 33 34 35 36 37 38 39 40 41 42 43 44 45 46 47 48 49 50 51 52 53 54 55 56 57 58 59 60 61 62 63 64 65 66 67 68 69 70 71 72 73 74 75 76 77 78 79 80 81 82 83 84 85 86 |
#include <ESP8266WiFi.h> #include <Servo.h> const char *ssid = "Provide SSID of wireless router here"; const char *password = "Provide the wireless router password here"; Servo myservo; WiFiServer server(80); void setup() { Serial.begin(115200); delay(10); Serial.println(); Serial.println(); Serial.print("Connecting to "); Serial.println(ssid); WiFi.begin(ssid, password); while (WiFi.status() != WL_CONNECTED) { delay(1500); Serial.print("."); } Serial.println(""); Serial.println("WiFi connected"); server.begin(); Serial.println("Server started"); Serial.println(WiFi.localIP()); myservo.attach(2); } void loop() { WiFiClient client = server.available(); if (!client) { return; } Serial.println("new client"); while(!client.available()){ delay(1); } String req = client.readStringUntil('\r'); Serial.println(req); client.flush(); // Match the request int val; if (req.indexOf("/gpio/0") != -1){ val = 0; } else if (req.indexOf("/gpio/30") != -1){ val = 30; } else if (req.indexOf("/gpio/60") != -1){ val = 60; } else if (req.indexOf("/gpio/90") != -1){ val = 90; } else if (req.indexOf("/gpio/120") != -1){ val = 120; } else if (req.indexOf("/gpio/150") != -1){ val = 150; } else { Serial.print("REQ:"); Serial.println(req); Serial.println("invalid request"); client.stop(); return; } myservo.write(val); client.flush(); String s = "HTTP/1.1 200 OK\r\nContent-Type: text/html\r\n\r\n<!DOCTYPE HTML>\r\n<html>\r\nGPIO is now "; s += (val)?"high":"low"; s += "<ul>"; s += "<li><a href='/gpio/0/'>0</a></li>\n"; s += "<li><a href='/gpio/30/'>30</a></li>\n"; s += "<li><a href='/gpio/60/'>60</a></li>\n"; s += "<li><a href='/gpio/90/'>90</a></li>\n"; s += "<li><a href='/gpio/120/'>120</a></li>\n"; s += "<li><a href='/gpio/150/'>150</a></li>\n"; s += "</ul>\n"; s += "</html>\n"; client.print(s); delay(1); Serial.println("Client disonnected"); } |
在這個程式中,瀏覽器顯示的角度為0到150。當點擊每個數值時,伺服馬達會行動到一個指定角度。
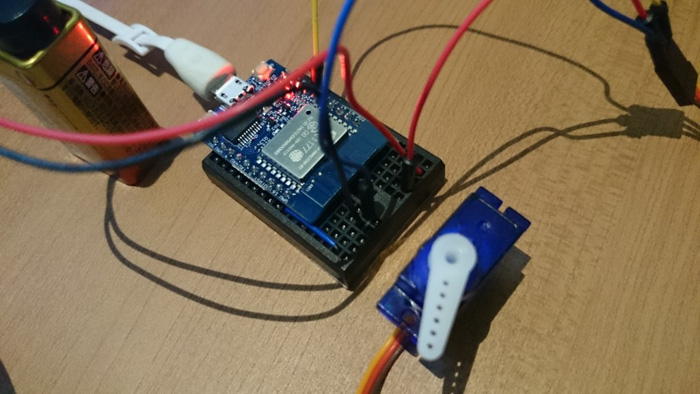
圖5 通過Wifi進行伺服馬達控制
讓我們來製作我們的天氣預報雪人吧!
耶誕節即將到來,我決定做一個耶誕節裝飾品。大量的炫彩LED裝飾燈固然不錯,但是桌子上的可愛飾品則更具耶誕節韻味。所以,我用123d設計創建了一個雪人模型。這款工具可以在組合不同形狀的同時進行建模,所以即使是初學者也可以輕鬆創建3D模型。
雪人模型

圖6 雪人建模
請根據個人喜好隨意更改雪人的形狀或大小。建模完成後,我試著用3D印表機輸出自己設計的雪人。不幸的是,手臂並沒有列印出來。
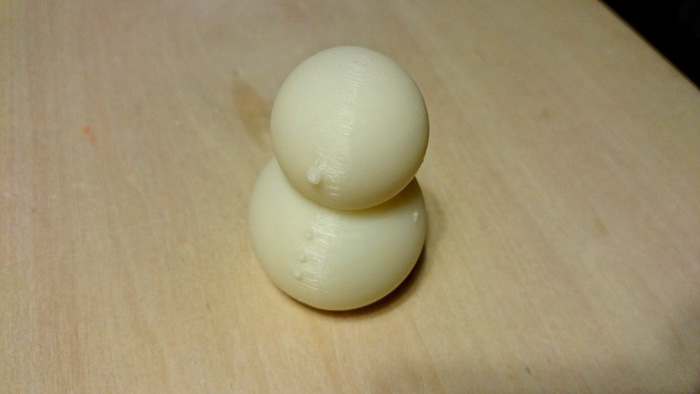
圖7 3D列印的雪人
現在我們需要一個全彩LED。讓我們將全彩LED和WiFi通信整合到一個桌面裝置中,使得該裝置能夠根據特定位置的天氣資料改變LED的顏色。
裝置配置
像往常一樣,在創建程式或電路之前我們先考慮一下裝置配置。總體結構如下圖所示。

圖8 整體裝置配置
您也可以直接從Arduino程式連至API來處理和檢索資料,但由於Arduino程式的容量很小,我們可以考慮外部擴展,Arduino會安裝一個外部伺服器“SERVER PROGRAM”並提出請求。這個外部伺服器程式連至API,以JSON格式獲取資料,然後只將必要的資料返回給Arduino。
從API獲取天氣資訊
這次,我們使用的API名字叫做OpenWeatherMap。註冊後,您就可以免費使用該API。通過該API,您可以通過輸入位置資訊和城市名稱來獲取具體地點的天氣資訊。

圖 9. http://openweathermap.org/
連接API的外部伺服器程式用PHP創建。通過以下程式,我們可以利用國家、城市、appid-API金鑰作為參數來獲取天氣資訊。我們在運行PHP的環境中安裝此程式並確認該操作。
外部伺服器程式(PHP):從天氣API獲得資料
|
1 2 3 4 5 6 7 8 9 10 11 12 13 |
<?php $country = htmlspecialchars($_GET["country"], ENT_QUOTES, 'UTF-8'); $city = htmlspecialchars($_GET["city"], ENT_QUOTES, 'UTF-8'); $appid = htmlspecialchars($_GET["appid"], ENT_QUOTES, 'UTF-8'); $jsonAry = json_decode(file_get_contents("http://api.openweathermap.org/data/2.5/weather?q=".$city.",".$country."&APPID=".$appid)); if(isset($jsonAry->weather)){ echo $jsonAry->weather[0]->main; } else{ echo "no result"; } |
通過電瀏覽器訪問程式時,如果系統顯示指定城市的天氣資訊,那麼操作完成。

圖10 瀏覽器確認
全彩LED發光控制
接下來,我們來看看如何在輸出端使用全彩LED。雖然我們將其稱為全彩LED,其實是一塊板上的RGB(即紅、綠、藍)LED。
如圖11所示,由於每種顏色的LED都以+和-組合的形式發光,因此我們對其進行焊接,以便可以連接到麵包板上。
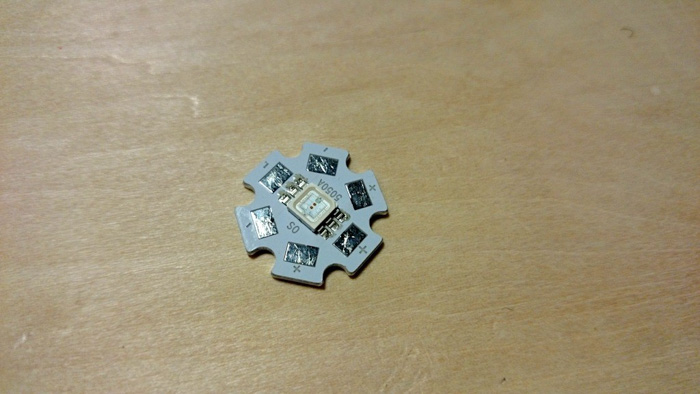
圖11 全彩LED
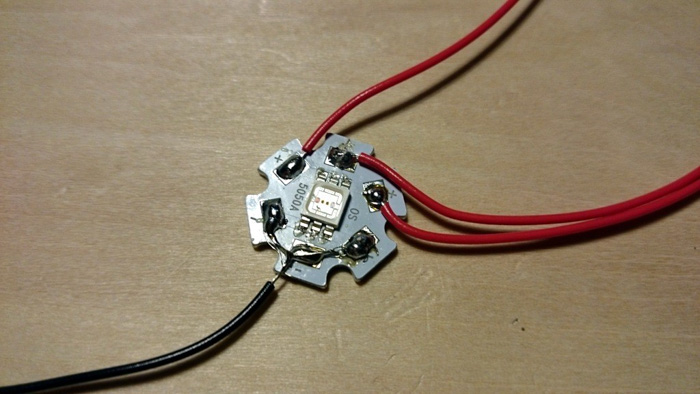
圖12 焊接全彩LED
如果同時點亮3個全彩LED,那麼顏色會變成白光。由於每個顏色LED所需的電壓和電流量不同,所以需要為每個電路添加不同的電阻值。
- 91 Ω: 紅色
- 180 Ω: 綠色
- 220 Ω: 藍色
從API獲取資料時,根據以下天氣資訊顯示顏色。
- 晴天 – 陽光充足 → 紅色
- 雲 – 陰天 → 綠色
- 下雨 – 下雨 → 綠色
- 下雪 – 下雪 → 淺綠色

圖13 全彩LED控制電路圖
ESP-WROOM-02: 根據天氣變換顏色
|
1 2 3 4 5 6 7 8 9 10 11 12 13 14 15 16 17 18 19 20 21 22 23 24 25 26 27 28 29 30 31 32 33 34 35 36 37 38 39 40 41 42 43 44 45 46 47 48 49 50 51 52 53 54 55 56 57 58 59 60 61 62 63 64 65 66 67 68 69 70 71 72 73 74 75 76 77 78 79 80 81 82 83 84 85 86 87 88 89 90 91 92 93 94 95 96 97 98 99 100 101 102 103 104 105 106 107 108 109 110 111 112 113 114 115 116 117 118 119 |
#include <ESP8266WiFi.h> const char *ssid = "Provide SSID of wireless router here"; const char *password = "Provide the wireless router password here"; const char* host = "external server host name where the program is installed"; const char* appid = "Set API key"; // APPID registered with OnlineWeatherMap const char* city = "Seattle"; //select city const char* country = "us"; //select country int color[3] = {255,255,255}; int colorPin[3] = {11,12,13}; void setup() { Serial.begin(115200); delay(10); Serial.println(); Serial.println(); Serial.print("Connecting to "); Serial.println(ssid); WiFi.begin(ssid, password); while (WiFi.status() != WL_CONNECTED) { delay(500); Serial.print("."); } Serial.println(""); Serial.println("WiFi connected"); Serial.println("IP address: "); Serial.println(WiFi.localIP()); } int value = 0; void loop() { delay(1000); ++value; Serial.print("connecting to "); Serial.println(host); WiFiClient client; const int httpPort = 80; if (!client.connect(host, httpPort)) { Serial.println("connection failed"); return; } String url = "/sample/esp-wroom-02/weather.php"; url += "?appid="; url += appid; url += "&country="; url += country; url += "&city="; url += city; Serial.print("Requesting URL: "); Serial.println(url); client.print(String("GET ") + url + " HTTP/1.1\r\n" + "Host: " + host + "\r\n" + "Connection: close\r\n\r\n"); delay(1000); while(client.available()){ String line = client.readStringUntil('\r'); line.trim(); if(line.equals("Clouds")){ color[0] = 255; color[1] = 0; color[2] = 0; } else if(line.equals("Clear")){ color[0] = 0; color[1] = 0; color[2] = 255; } else if(line.equals("Rain")){ color[0] = 0; color[1] = 255; color[2] = 0; } else if(line.equals("Snow")){ color[0] = 55; color[1] = 128; color[2] = 255; } Serial.println(line); } for (int fadeValue = 0 ; fadeValue <= 255; fadeValue += 5) { for(int cp = 0; cp < 3; cp++){ float ledValue = color[cp] / 255; ledValue = ledValue * fadeValue; Serial.print("cp:"); Serial.print(colorPin[cp]); Serial.print(" ledValue:"); Serial.println((int)ledValue); analogWrite(colorPin[cp], (int)ledValue); } delay(100); } for (int fadeValue = 255 ; fadeValue >= 0; fadeValue -= 5) { for(int cp = 0; cp < 3; cp++){ float ledValue = color[cp] / 255; ledValue = ledValue * fadeValue; analogWrite(colorPin[cp], (int)ledValue); } delay(100); } Serial.println(); Serial.println("closing connection"); } |
在這個程式中,每次獲取資料以確認操作。請根據自己的喜好更改設定。啟動程式後,裝置會根據獲取的天氣資料發光。

圖14 雪人根據獲得的天氣資料發光
最後我們對雪人進行了一些修飾,專案完成。

圖15 完成雪人的裝飾
這一次,我們利用天氣API創建了一個可愛的聖誕裝飾品。通過整合其他API、程式以及智慧行動電話連接,我相信您能夠創作更加有趣的裝置。歡迎您在下方的評論中分享您想法!


