採用ROHM感測器套件的DIY Arduino家庭保全系統 第2部分 — Cayenne設定

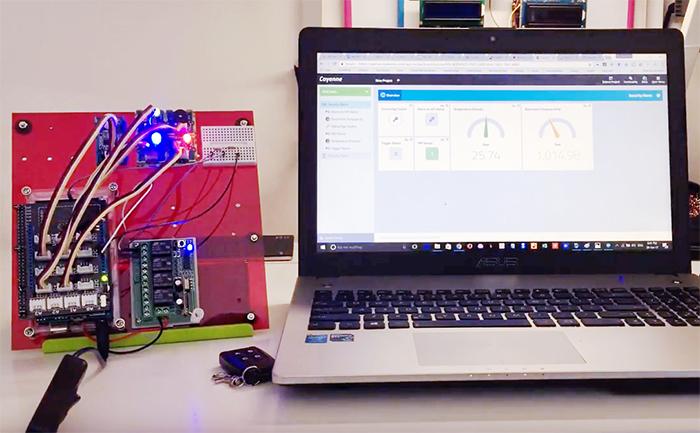
在DIY智慧家居保全系統 第1部分中,我們將各種元件(例如PIR感測器、溫度感測器和壓力感測器)組合在一起,以創建家庭保全系統/探測器。在第2部分中,將對前面所創建系統的離線程式進行測試,並連接到Internet,以便使用Cayenne API進行無線控制。使用myDevices Cayenne,只要您通過網站和/或智慧行動電話中的Cayenne App連接到WiFi,您就能夠無線控制保全系統。
硬體
- 筆記型電腦/PC或智慧型行動電話
參考第1部分:
- Arduino Mega 2560
- Arduino WiFi Shield(Arduino WiFi擴展板)
- 用於Arduino的Grove Base Shield(Grove基礎擴展板)
- 3 只 LED (紅色、綠色和藍色)
- Grove PIR 行動偵測感測器
- 蜂鳴器
- Arduino ROHM 感測器擴展板
- ROHM 溫度感測器 (BD1020HFV)
- ROHM 氣壓感測器 (BM1383GLV)
- Grove 通用4芯電線
- 壓克力: 195 x 195 x 3mm
- 電阻 (10 Kω and 100 KΩ)
- 麵包板
- 無線遙控器,帶2個射極器和1個接收器
- 電源:12VDC
軟體
- Arduino IDE
- Seeed Studio (https://github.com/Seeed-Studio/PIR_Motion_Sensor, http://www.seeed.cc/project_detail.html?id=284)
- Cayenne API (https://mydevices.com/cayenne/docs/#using-cayenne-library)
使用離線程式測試硬體
完成硬體安裝後,現在可以運行離線程式進行測試。這是“離線”模式,系統尚未連接到Internet。我們馬上就進行測試。離線程式將執行下列功能:
- 遙控射極器(在示例中使用頻道D)打開/斷路警報。如果遙控射極器打開,綠色 LED將亮起,蜂鳴器將發出一次嗶嗶聲。
- PIR感測器將檢測行動情況。如果檢測到行動,藍色 LED 將亮起。
- 當警報聲響起並檢測到行動時,紅色 LED將亮起,蜂鳴器將熄滅。
- 同樣,當警報聲響起(即綠色 LED亮起)且熱量高於設定目標時,紅色 LED將亮起,蜂鳴器將熄滅。
注:
若想斷路警報聲,用戶只需再次按遙控射極器上的頻道D。綠色 LED將熄滅,蜂鳴器將發出兩次嗶嗶聲。
若需查看溫度和氣壓的值,請將USB電線從Arduino連接到PC。然後,進入Arduino IDE並按一下工具 → 序列監視器。
現在可以上傳程式。進行編譯以前,請確保已安裝所有必需的程式館。
|
1 2 3 4 5 6 7 8 9 10 11 12 13 14 15 16 17 18 19 20 21 22 23 24 25 26 27 28 29 30 31 32 33 34 35 36 37 38 39 40 41 42 43 44 45 46 47 48 49 50 51 52 53 54 55 56 57 58 59 60 61 62 63 64 65 66 67 68 69 70 71 72 73 74 75 76 77 78 79 80 81 82 83 84 85 86 87 88 89 90 91 92 93 94 95 96 97 98 99 100 101 102 103 104 105 106 107 108 109 110 111 112 113 114 115 116 117 118 119 120 121 122 123 124 125 126 127 128 129 130 131 132 133 134 135 136 137 138 139 140 141 142 143 144 145 146 147 148 149 150 151 152 153 154 155 156 157 158 159 160 161 162 163 164 165 166 167 168 169 170 171 172 173 174 175 176 177 178 179 180 181 182 183 184 185 186 187 188 189 190 191 192 193 194 195 196 197 198 199 200 201 202 203 204 205 206 207 208 209 210 211 212 213 214 215 216 217 218 219 220 221 222 223 224 225 226 227 228 229 230 231 232 233 234 235 236 237 238 239 240 241 242 243 244 245 246 247 248 249 250 251 252 253 254 255 256 257 258 259 260 261 262 263 264 265 266 267 268 269 270 271 272 273 274 275 276 277 278 279 280 281 282 283 284 285 286 287 288 289 290 291 292 293 294 295 296 297 298 299 300 301 302 303 304 305 306 307 308 309 310 311 312 313 314 315 316 317 318 319 320 321 322 323 324 325 326 327 328 329 330 331 332 333 334 335 336 337 338 339 340 341 342 343 344 345 346 347 348 349 350 351 352 353 354 355 356 357 358 359 360 361 362 363 364 365 366 367 368 369 370 371 372 373 374 375 376 377 |
//**************** Home security Program - offline ****************************** #define PIR_MOTION_SENSOR 2 // Use pin 2 to receive the signal from the module #define LED1 4 // Blue Led for motion detected #define LED2 6 // Green Led for triggered alarm #define LED3 8 // Red Led if motion and trigger switch are on #define buzzer 5 // Buzzer #define remote 41 // Remote Control #include <Wire.h> #include <BM1383GLV.h> #include <BD1020.h> int alarm = 0; int trigger = 0; int remote_sw = 0; int online_sw = 0; int previousState = -1; int currentState = -1; int prev_remote_stat = 0; int curr_remote_stat = 0; int currentValue = 0; int prev_online_stat = 0; int curr_online_stat = 0; int tempout_pin = A2; BM1383GLV bm1383; BD1020 bd1020; unsigned long previousMillis = 0; void setup() { Serial.begin(9600); while (!Serial); bd1020.init(tempout_pin); byte rc; while (!Serial); Wire.begin(); rc = bm1383.init(); pinMode(LED1,OUTPUT); pinMode(LED2,OUTPUT); pinMode(LED3,OUTPUT); pinMode(buzzer, OUTPUT); pinMode(remote, INPUT); pinMode(PIR_MOTION_SENSOR, INPUT); } // ********************* Start Loop ***************************************** void loop() { checkSensor(); remote_sw = digitalRead(remote); Serial.print("Remote Status : "); Serial.println(remote_sw); Serial.println(); //*********************** read barometric pressure ************************ byte rc; float press; rc = bm1383.get_val(&press); if (rc == 0) { Serial.write("BM1383GLV (PRESS) = "); Serial.print(press); Serial.println(" [hPa]"); Serial.println(); } //********************** read Temperature ******************************** float temp; bd1020.get_val(&temp); temp = temp - 5; // Temperature adjustment due to heat from circuit board Serial.print("BD1020HFV Temp="); Serial.print(temp); Serial.print(" [degrees Celsius], ADC="); Serial.println(bd1020.temp_adc); Serial.println(); // ********** Check if Remote switch or online/App switch is on ********** if(remote_sw == 1 | currentValue == 1) { digitalWrite(LED2,HIGH); alarm = 1; curr_remote_stat = 1; if(curr_remote_stat != prev_remote_stat) { triggerBuzzer(2,70,30); prev_remote_stat = curr_remote_stat; } } else { curr_remote_stat = 0; if(curr_remote_stat != prev_remote_stat) { triggerBuzzer(3,70,30); prev_remote_stat = curr_remote_stat; } digitalWrite(LED2,LOW); alarm = 0; } // ********************** If motion detected *********************** if(isPeopleDetected()) //if it detects the moving people? { digitalWrite(LED1, HIGH); // Turn on Blue Led trigger = 1; delay(10); } else { digitalWrite(LED1, LOW); trigger = 0; delay(2000); } // ***************If Alarm is triggerred ************************** if (alarm == 1 && trigger == 1 ) { digitalWrite(LED3,HIGH); delay(500); triggerBuzzer(6,100,100); Serial.println("Alarm triggered"); } else { alarm = 0; trigger = 0; digitalWrite(LED3,LOW); } // *********************** If temperature is triggerred ********** if (temp > 45.00) { digitalWrite(LED3,HIGH); delay(500); triggerBuzzer(10,100,10); Serial.println("Alarm triggered"); } delay(10); } // ************************** End Loop ***************************** // Function: Write to PIR sensor indicator in Web/App *************** void checkSensor() { unsigned long currentMillis = millis(); if (currentMillis - previousMillis >= 250) { currentState = digitalRead(PIR_MOTION_SENSOR); if (currentState != previousState) { previousState = currentState; } previousMillis = currentMillis; } } //*************************************************************** // Function: Detect whether anyone moves in it's detecting range boolean isPeopleDetected() { int sensorValue = digitalRead(PIR_MOTION_SENSOR); if(sensorValue == HIGH) //if the sensor value is HIGH? { Serial.println("PIR detect motion"); return true; //yes,return true } else { Serial.println("no motion"); return false; //no,return false } } //*************************************************************** // Function : activate buzzer based on parameters received void triggerBuzzer(int iteration,int delay1,int delay2) { for (int i = 1; i < iteration; i++) { digitalWrite(buzzer, HIGH); delay(delay1); digitalWrite(buzzer, LOW); delay(delay2); } } //***************************************************************** |
準備線上連接
創建一個myDevices帳戶!您可以通過以下連結註冊並創建一個新帳戶:https://mydevices.com/cayenne/signup/
如果您已經擁有帳戶,請隨意使用自己的帳戶。

圖1. 註冊頁面 – https://mydevices.com/cayenne/signup/
然後選擇Arduino作為本專案的裝置。
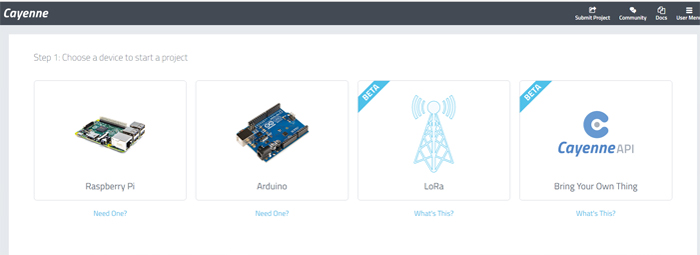
圖2. 選擇本專案所需的Arduino裝置
閱讀文檔並通過以下網站安裝Cayenne程式館:
https://mydevices.com/cayenne/docs/#using-cayenne-library
然後繼續下一步,在新網頁中連接到Arduino。選擇Arduino Mega和WiFi Shield。選定這兩項後,您將收到裝置的“身份驗證口令”。務必複製此口令並將其保存於某處。在下一個程式中需要用到此口令。
char token[] = “zzzzzzz”; // Cayenne authentication token
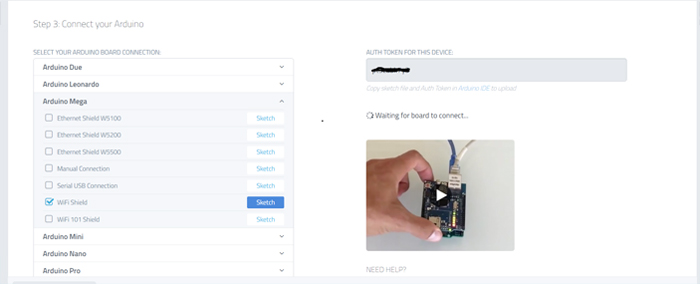
圖3. 選擇Arduino Mega和WiFi Shield

圖4. 創建感測器微件
創建微件
我們可以為PIR感測器、觸發狀態和警報開/關狀態創建微件。
為此,必須按一下 “添加新…” ,然後按一下 “裝置/微件”。然後轉到 “感測器” 類別並按一下 “通用”。在“通用”下,有2個輸入選項:類比輸入和數位輸入。選擇 “數位輸入”。進入“數位輸入”設定頁面後,將連接設定為“虛擬”和“V1”(在下方)。請勿忘記按一下 步驟 1 和 步驟 2。
V2和V4微件也按相同步驟操作。請使用下表作為參考:
| 虛擬頻道號 | 微件名稱 | 選擇微件 | 選擇圖示/顯示 | 連接至 |
| V1 | PIR 感測器 | 0/1 2 狀態 | 顯示值 | PIR 感測器 – 藍色 Led |
| V2 | 觸發狀態 | 0/1 2 狀態 | 顯示值 | 觸發開關 – 紅色 Led |
| V4 | 警報狀態開/關 | 0/1 2 狀態 | 圖示指示燈 | 遠端開關 |
代碼中使用的虛擬引腳分配如下:
#define VIRTUAL_PIN1 V1 // PIR感測器的虛擬引腳 – 藍色 Led
#define VIRTUAL_PIN2 V2 // 觸發開關的虛擬引腳 – 紅色 Led
#define VIRTUAL_PIN4 V4 // 遠端開關的狀態
- 當PIR感測器檢測到發生行動時,V1將開啟(顏色變為綠色);藍色LED也將亮起。
- 當觸發狀態開啟時,V2將開啟(顏色變為綠色);當警報開啟且PIR感測器檢測到發生行動時,紅色LED也將亮起。
- 通過遙控射極器或線上/應用程式開啟警報狀態時,V4將開啟(顏色變為綠色)
接下來為線上/應用程式開關功能創建一個微件。
轉至 “添加新…” ,然後按一下 “裝置/微件”。這次選擇 “執行器” ,然後選擇 “通用”。選擇 “數位輸出” ,然後在“連接”下選擇“虛擬”。在“Pin”下,選擇“V3”。

圖5. 創建線上/應用程式開關功能的微件
使用下表作為參考:
| 虛擬頻道號 | 微件名稱 | 選擇微件 | 選擇圖示/顯示 | 連接到 |
| V3 | 線上/應用程式開關 | 按鈕 | 圖示鎖定 | 線上/應用程式開關 — 綠色 LED |
按一下微件(在網站/應用程式上)時,V3將開啟(顏色變為紫色)。當V3開啟時,綠色LED也會亮起。因此,該虛擬開關與遙控射極器功能相同。但是,通過此虛擬交換機啟動時會有一段延時。在下一程式中以下代碼將會引用引腳V3。
#define VIRTUAL_PIN3 V3 // 線上開關 – 綠色 led
然後需要創建溫度和壓力感測器的微件。和前面一樣,點擊 “添加新…” 和 “裝置/微件”。然後選擇 “感測器” 和 “通用” ,然後選擇 “類比輸入”。連接後,選擇“虛擬”和“V5”進行引腳選擇。

圖6. 創建溫度和壓力感測器的微件
對V6執行相同操作並使用下表作為參考:
| 虛擬頻道號 | 微件名稱 | 選擇微件 | 選擇單位 | 連接到 |
| V5 | 溫度(℃) | 測量精度 | 有效位數 – 小數點後2位 | 溫度感測器 |
| V6 | 氣壓(hPa) | 測量精度 | 有效位數 – 小數點後2位 | 大氣壓力感測器 |
在下一程式中以下代碼將會引用引腳V5和V6。
#define VIRTUAL_PIN5 V5 // 溫度感測器
#define VIRTUAL_PIN6 V6 // 氣壓感測器
如果上述所有步驟都正確完成,您將看到如圖7所示的頁面。

圖7. 微件的顯示
最後一步是啟用電子郵件通知功能(觸發警報時)。為此,請按一下“觸發器狀態”微件上的設定符號,然後選擇“觸發器”。

圖8. 創建電子郵件觸發器
然後,您將進入以下頁面(圖9)。在“添加自訂收件人”中鍵入您的電子郵寄位址,然後按一下“發送電子郵件”。

圖9. 設定電子郵件通知
myDevices設定到此結束!
測試線上程式
以上已經完成了與家庭保全系統的線上連接設定。運行最終程式前可以先測試線上程式。
上傳以下程式。確保已安裝適用於Arduino的Cayenne程式館。該程式用於執行簡單的功能(即顯示溫度和氣壓值)。正確運行時,溫度和氣壓微件將改變顏色(綠色和橙色),相應數值顯示於微件的底部。
|
1 2 3 4 5 6 7 8 9 10 11 12 13 14 15 16 17 18 19 20 21 22 23 24 25 26 27 28 29 30 31 32 33 34 35 36 37 38 39 40 41 42 43 44 45 46 47 48 49 50 51 52 53 54 55 56 57 58 59 60 61 62 63 64 65 66 67 68 69 70 71 72 73 74 75 76 77 78 79 80 81 82 83 84 85 86 87 88 89 90 91 92 93 94 95 96 97 98 99 100 101 102 103 104 105 106 107 108 109 110 111 112 113 114 115 116 117 118 119 120 121 122 123 124 125 126 127 128 129 130 |
//**************** Home security Program - online test*********************** * #define CAYENNE_DEBUG // Uncomment to show debug messages #define CAYENNE_PRINT Serial // Comment this out to disable prints and save space #define VIRTUAL_PIN5 V5 // Temperature sensor #define VIRTUAL_PIN6 V6 // Barometric Pressure Sensor #include <CayenneWiFi.h> // Cayenne wifi library #include <Wire.h> #include <BM1383GLV.h> #include <BD1020.h> char token[] = "zzzzzzz"; // Cayenne authentication token. char ssid[] = "xxxxxxxxx"; // Your Wifi network name char password[] = "yyyy"; // Your Wifi password int tempout_pin = A2; BM1383GLV bm1383; BD1020 bd1020; unsigned long previousMillis = 0; void setup() { Serial.begin(9600); while (!Serial); bd1020.init(tempout_pin); byte rc; while (!Serial); Wire.begin(); rc = bm1383.init(); Cayenne.begin(token, ssid, password); } // ********************* Start Loop ***************************************** void loop() { Cayenne.run(); //*********************** read barometric pressure ************************ byte rc; float press; rc = bm1383.get_val(&press); if (rc == 0) { Cayenne.virtualWrite(VIRTUAL_PIN6, press); // Write Barometric Pressure to Cayenne Serial.write("BM1383GLV (PRESS) = "); Serial.print(press); Serial.println(" [hPa]"); Serial.println(); } //********************** read Temperature ******************************** float temp; bd1020.get_val(&temp); temp = temp - 5; // Temperature adjustment due to heat from circuit board Cayenne.virtualWrite(VIRTUAL_PIN5, temp); // Write Temperature to Cayenne Serial.print("BD1020HFV Temp="); Serial.print(temp); Serial.print(" [degrees Celsius], ADC="); Serial.println(bd1020.temp_adc); Serial.println(); // ********** Check if Remote switch or online/App switch is on ********** delay(5000); } // ************************** End Loop ***************************** |
至此差不多完成了所有步驟!
最終方案
如果以上所有程式都能流暢運行,則可上傳最終程式,該程式中嵌入了離線程式以及與Cayenne API的連接功能。
|
1 2 3 4 5 6 7 8 9 10 11 12 13 14 15 16 17 18 19 20 21 22 23 24 25 26 27 28 29 30 31 32 33 34 35 36 37 38 39 40 41 42 43 44 45 46 47 48 49 50 51 52 53 54 55 56 57 58 59 60 61 62 63 64 65 66 67 68 69 70 71 72 73 74 75 76 77 78 79 80 81 82 83 84 85 86 87 88 89 90 91 92 93 94 95 96 97 98 99 100 101 102 103 104 105 106 107 108 109 110 111 112 113 114 115 116 117 118 119 120 121 122 123 124 125 126 127 128 129 130 131 132 133 134 135 136 137 138 139 140 141 142 143 144 145 146 147 148 149 150 151 152 153 154 155 156 157 158 159 160 161 162 163 164 165 166 167 168 169 170 171 172 173 174 175 176 177 178 179 180 181 182 183 184 185 186 187 188 189 190 191 192 193 194 195 196 197 198 199 200 201 202 203 204 205 206 207 208 209 210 211 212 213 214 215 216 217 218 219 220 221 222 223 224 225 226 227 228 229 230 231 232 233 234 235 236 237 238 239 240 241 242 243 244 245 246 247 248 249 250 251 252 253 254 255 256 257 258 259 260 261 262 263 264 265 266 267 268 269 270 271 272 273 274 275 276 277 278 279 280 281 282 283 284 285 286 287 288 289 290 291 292 293 294 295 296 297 298 299 300 301 302 303 304 305 306 307 308 309 310 311 312 313 314 315 316 317 318 319 320 321 322 323 324 325 326 327 328 329 330 331 332 333 334 335 336 337 338 339 340 341 342 343 344 345 346 347 348 349 350 351 352 353 354 355 356 357 358 359 360 361 362 363 364 365 366 367 368 369 370 371 372 373 374 375 376 377 378 379 380 381 382 383 384 385 386 387 388 389 390 391 392 393 394 395 396 397 398 399 400 401 402 403 404 405 406 407 408 409 410 411 412 413 414 415 416 417 418 419 420 421 422 423 424 425 426 427 428 429 430 431 432 433 434 435 436 437 438 439 440 441 442 443 444 445 446 447 |
//**************** Home security Program - Final ****************************** #define CAYENNE_DEBUG // Uncomment to show debug messages #define CAYENNE_PRINT Serial // Comment this out to disable prints and save space #define VIRTUAL_PIN1 V1 // Virtual Pin for PIR sensor - Blue Led #define VIRTUAL_PIN2 V2 // Virtual Pin for Trigger Switch - Red Led #define VIRTUAL_PIN3 V3 // Online Switch - Green led #define VIRTUAL_PIN4 V4 // Status of Remote Switch #define VIRTUAL_PIN5 V5 // Temperature sensor #define VIRTUAL_PIN6 V6 // Barometric Pressure Sensor #define PIR_MOTION_SENSOR 2 // Use pin 2 to receive the signal from the module #define LED1 4 // Blue Led for motion detected #define LED2 6 // Green Led for triggered alarm #define LED3 8 // Red Led if motion and triger switch are on #define buzzer 5 // Buzzer #define remote 41 // Remote Control #include <CayenneWiFi.h> // Cayenne wifi library #include <Wire.h> #include <BM1383GLV.h> #include <BD1020.h> char token[] = "zzzzzzz"; // Cayenne authentication token. char ssid[] = "xxxxxxxxx"; // Your Wifi network name char password[] = "yyyy"; // Your Wifi password int alarm = 0; int trigger = 0; int remote_sw = 0; int online_sw = 0; int previousState = -1; int currentState = -1; int prev_remote_stat = 0; int curr_remote_stat = 0; int currentValue = 0; int prev_online_stat = 0; int curr_online_stat = 0; int tempout_pin = A2; BM1383GLV bm1383; BD1020 bd1020; unsigned long previousMillis = 0; void setup() { Serial.begin(9600); while (!Serial); bd1020.init(tempout_pin); byte rc; while (!Serial); Wire.begin(); rc = bm1383.init(); Cayenne.begin(token, ssid, password); pinMode(LED1,OUTPUT); pinMode(LED2,OUTPUT); pinMode(LED3,OUTPUT); pinMode(buzzer, OUTPUT); pinMode(remote, INPUT); pinMode(PIR_MOTION_SENSOR, INPUT); } // ************ Check if Online/App Switch is on ***************************** CAYENNE_IN(VIRTUAL_PIN3) {currentValue = getValue.asInt();} // ********************* Start Loop ***************************************** void loop() { Cayenne.run(); Serial.print("currentValue: "); Serial.println(currentValue); checkSensor(); remote_sw = digitalRead(remote); Serial.print("Remote Status : "); Serial.println(remote_sw); Serial.println(); //*********************** read barometric pressure ************************ byte rc; float press; rc = bm1383.get_val(&press); if (rc == 0) { Cayenne.virtualWrite(VIRTUAL_PIN6, press); Serial.write("BM1383GLV (PRESS) = "); Serial.print(press); Serial.println(" [hPa]"); Serial.println(); } //********************** read Temperature ******************************** float temp; bd1020.get_val(&temp); temp = temp - 5; // Temperature adjustment due to heat from circuit board Cayenne.virtualWrite(VIRTUAL_PIN5, temp); Serial.print("BD1020HFV Temp="); Serial.print(temp); Serial.print(" [degrees Celsius], ADC="); Serial.println(bd1020.temp_adc); Serial.println(); // ********** Check if Remote switch or online/App switch is on ********** if(remote_sw == 1 | currentValue == 1) { digitalWrite(LED2,HIGH); Cayenne.virtualWrite(VIRTUAL_PIN4, HIGH); alarm = 1; curr_remote_stat = 1; if(curr_remote_stat != prev_remote_stat) { triggerBuzzer(2,70,30); prev_remote_stat = curr_remote_stat; } } else { curr_remote_stat = 0; if(curr_remote_stat != prev_remote_stat) { triggerBuzzer(3,70,30); prev_remote_stat = curr_remote_stat; } digitalWrite(LED2,LOW); Cayenne.virtualWrite(VIRTUAL_PIN4, LOW); alarm = 0; } // ********************** If motion detected *********************** if(isPeopleDetected()) //if it detects the moving people? { digitalWrite(LED1, HIGH); // Turn on Blue Led trigger = 1; delay(10); } else { digitalWrite(LED1, LOW); trigger = 0; delay(2000); } // ***************If Alarm is triggerred ************************** if (alarm == 1 && trigger == 1 ) { digitalWrite(LED3,HIGH); Cayenne.virtualWrite(VIRTUAL_PIN2, HIGH); delay(500); triggerBuzzer(6,100,100); Serial.println("Alarm triggered"); } else { alarm = 0; trigger = 0; digitalWrite(LED3,LOW); Cayenne.virtualWrite(VIRTUAL_PIN2, LOW); } // *********************** If temperature is triggerred ********** if (temp > 45.00) { digitalWrite(LED3,HIGH); Cayenne.virtualWrite(VIRTUAL_PIN2, HIGH); delay(500); triggerBuzzer(10,100,10); Serial.println("Alarm triggered"); } delay(10); } // ************************** End Loop ***************************** // Function: Write to PIR sensor indicator in Web/App *************** void checkSensor() { unsigned long currentMillis = millis(); if (currentMillis - previousMillis >= 250) { currentState = digitalRead(PIR_MOTION_SENSOR); if (currentState != previousState) { Cayenne.virtualWrite(VIRTUAL_PIN1, currentState); previousState = currentState; } previousMillis = currentMillis; } } //*************************************************************** // Function: Detect whether anyone moves in it's detecting range boolean isPeopleDetected() { int sensorValue = digitalRead(PIR_MOTION_SENSOR); if(sensorValue == HIGH) //if the sensor value is HIGH? { Serial.println("PIR detect motion"); return true; //yes,return true } else { Serial.println("no motion"); return false; //no,return false } } //*************************************************************** // Function : activate buzzer based on parameters received void triggerBuzzer(int iteration,int delay1,int delay2) { for (int i = 1; i < iteration; i++) { digitalWrite(buzzer, HIGH); delay(delay1); digitalWrite(buzzer, LOW); delay(delay2); } } // ***************************************************************** |
以下幾種方法可以測試程式是否正常運行。
檢查觸發警報時是否發送電子郵件。您應收到如圖10所示的電子郵件。
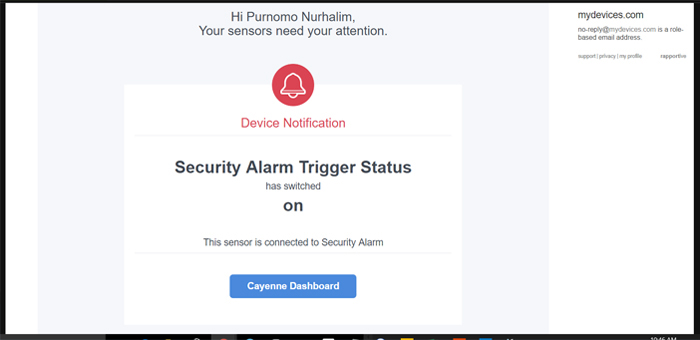
圖10. 觸發警報時收到的電子郵件通知
檢查您是否可以看到溫度和氣壓圖。如需顯示圖形,請按一下視窗微件右上角的圖形符號。
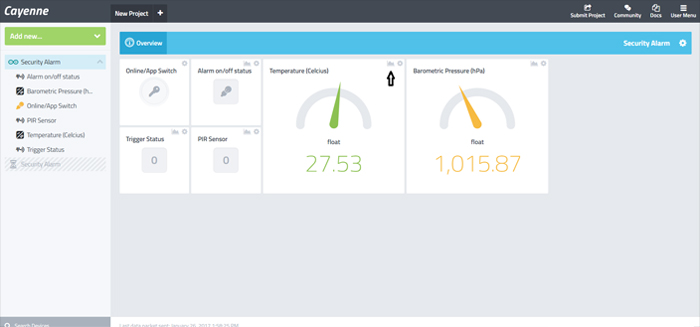
圖11. 感測器的圖形符號的顯示
然後還會顯示圖表:

圖12. 溫度曲線圖示例
下載智慧手機APP
如前所述,無論何時何地只要您能連接WiFi,您就可以24/7全天候對保全系統進行監控。您可以在網站上或通過Cayenne手機APP進行監控。您可以在智慧手機上直接下載Cayenne APP。進入App Store(適用於iPhone)或Google Play商店(適用於Android)並搜索Cayenne然後就能下載。
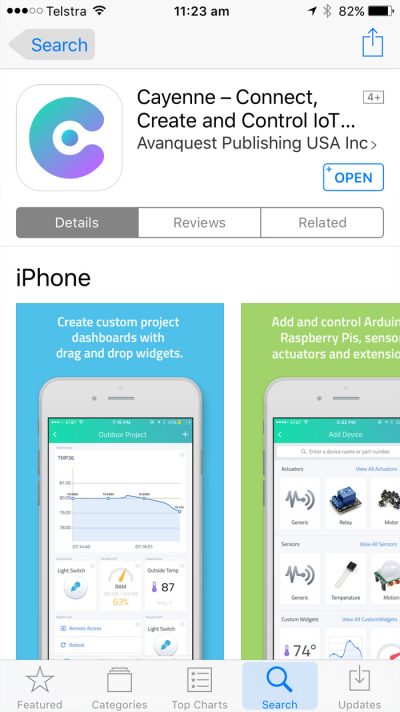
圖13. Cayenne App
成功安裝應用程式後,應用程式圖示會顯示在主螢幕上。

按一下應用程式圖示並登錄myDevices帳戶(電子郵件ID和密碼應與上一次設定帳戶時相同)。登錄後,您將看到您創建的微件。現在按一下線上/應用程式開關微件就可以打開/斷路警報;警報開/關狀態顏色變為綠色,如下圖所示:
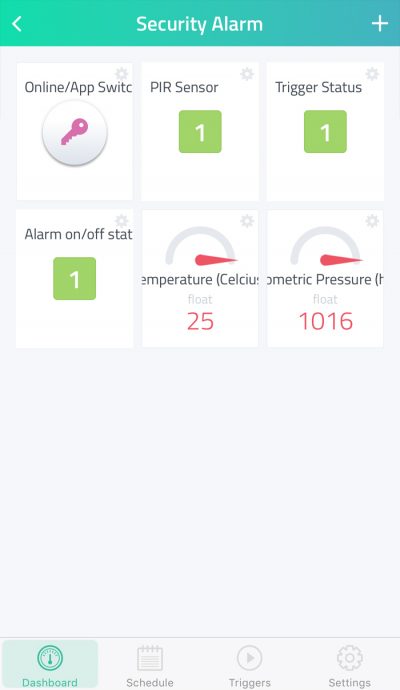
圖14. Cayenne App微件
恭喜您!完整的系統已經建立!每當觸發警報時,您將收到電子郵件通知。
這是一個包含多個模組的有趣專案。將來還可以添加更多感測器並增加其他功能和多個蜂鳴器,以使嗶嗶聲更大。我們還可以考慮通過更換一些元件來縮小系統規模。在此之前,盡情享受吧!


